Evil version of the first enemy pogo that saves about 0.3 greeded to its fullest, I think. You bonk like most of the time, it kinda sucks, but it is very fast lol. Also prepare for extremely jank float moments with this because I was getting a lot of those
Go up normally through the left side, then wait until the conchfly comes a bit closer and do a big jump so it goes over the platform. Stay on the right corner before jumping to make the spider enemy move up again so it gets out of your way for the actual skip. Then wait until the conchfly clears the right ledge of the rocky platform to climb up and pogo the enemy. Dont heal immediatly after dashing, wait a bit to guarantee the damage tank.
I recently discovered you can walljump off of a tiny corner above the Pinstress flag. You can get enough height from this to float all the way to the bottom cage, enabling you to do the second Blasted Steps skip. This is an extremely precise thing to perform, and it's probably just slower than most strats, but I think it's rather neat. I even messed up a little and delayed my first float, and I still made it across. I'm just wondering where these weird corner jumps can actually be useful.
I've seen @Gay say that they use a conchfly lure and also seen some other top runners struggling with the skip or aligning themselves into a perfect spot and losing time so I wanted to make this tutorial, since if I can do it consistently then so can they.
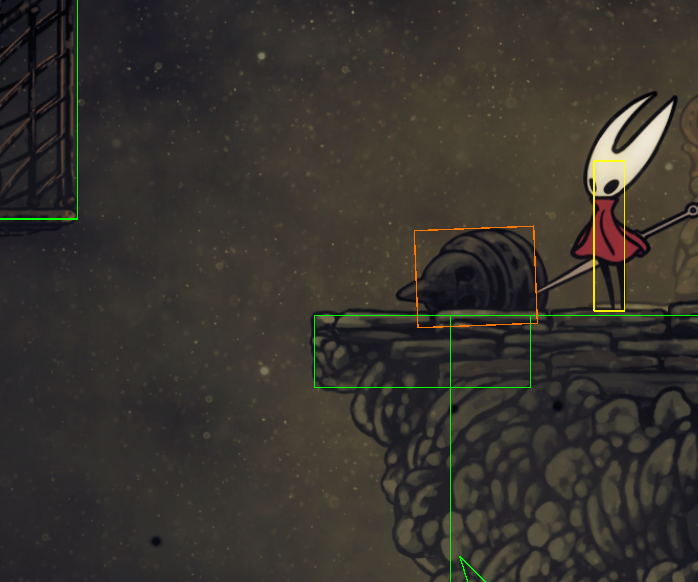
You still only have 3-4f to press jump most times, but this cue should give you a ballpark area for where to press jump. The decoration hitbox lines up pretty well with where the wall you’re meant to hit is. Considering how little time you have to jump, I personally interpret it as the base of the “horn” being where the wall is, which allows my hand time to press jump in the 3-4f window.
Here’s 3 blasted steps skips as well I guess. Do note that having wind will fuck you up if you try and aim for this (solution: jump earlier)
skip quick tutorial for blasted skip. theres two things you need to focus on, one is when to dash which is shown in the video, and the other you need to time the wall jump very very quickly as you only have a couple of frames
You can make wall grab entirely optional by luring the conchfly like this and dashing right beneath the cage. Very consistent if you lure the conchfly correctly. If doing it from the start of the room you might run into the problem that you have to damage tank the spider, but even then it still works effortlessly if you lure the conchly far enough. If you pogo too early and cloak the problem is that you wont keep enough velocity to reach the ledge
You can just keep holding dash through both of the jumps to consistently reach the left platform before the spider blocks the way. Climbing on the right wall makes this fully consistent because you can easily aim where you land and where you jump from. That way you can always reach the cage with no weird collisions. The usual left side walljumps also works most of the time but sometimes you grab the ledge on the cage instead. You can probably have a fully consistent left side setup too if you add in an extra jump or a wall dash. The right side is pretty much the same speed so it's just preference (there was a 0.05s difference from the moment of first touching the wall to the moment of landing on the first block you jump off of)
I re-worked Scotty's version of this skip to avoid having to do the precise jump off the platform. I haven't played around with it a ton yet, but I think it has potential. Here's the steps I follow to do this:
When jumping to the platform below the flying enemy, float underneath its aggro range to avoid waking it up.
Dash into the wall and walljump, holding right until you're just past the background flag.
Dash left and immediately hold right so that you begin a sprint turnaround the moment you land. You want to be fairly far right on the platform so you're close enough to cause the flying enemy to away, to the right.
Sprint jump a moment after landing, aiming to jump over the flying enemy.
If you clear the flying enemy, turn around and pogo it. You should pogo the top of its hitbox, not the side. If you jump into the enemy and get hit, you can still pogo it and make it to the right side. You can also make this step easier by hitting cloak just a moment before doing the pogo to help yourself line it up, but I'm not sure how consistent that is.
You can use the chain as a visual cue for timing your dash -> cloak repress in the air. I like to dash and repress cloak just before it.
I’ve done a little bit of research regarding this skip and have some examples to show. The main takeaway is that if you collide with the wall at all, you always have at least 1 frame in which you can press jump. How many frames you actually have depends on how far you are up.
There will be a few example videos, the first showing a scenario in which I slide off the wall, followed by an example of getting a walljump without cling. The main thing is that the first frame you collide with the walls, and the subsequent frames you are colliding with the wall, you are able to walljump, regardless of if hornet visually shows a cling grip state or not. The second video shows a successful BS2 in which I press jump the first possible frame without clinging.
The third video shows 3 examples, the first being pressing jump without cling on the third frame of collision. The second is of pressing jump 2f early (in a scenario in which I wouldn’t get cling), and the third is a sample cling grip. It seems if roughly half of hornets hitbox collides with the wall then she will cling.
If you cling grip you have 7 frames before downward acceleration starts, combined with the time it takes to slip off this means a clingged jump usually have at least 10f (0.167s) or so to be inputted from the wall. Conversely, in my own experience most non-clingged attempts have roughly 3-4f which you’re able to jump off of.
A lot of attempts you won’t get high enough to cling, but you will be able to hit this 3-4f window and still get the skip.
this only loses about 3 seconds to the fast strat, the jump is very precise though, you need to jump very late as otherwise you will bonk your head. If you miss the jump you can reload the room for not too much timeloss
reaching the right wall is free with this, need to be careful to not bonk your head on it as you can easily be too high
with practice this should be better than the heal strat i think
yet "another" way of doing 2nd skip, so apparently you dont need to cloak twice, i'm having a lot of trouble with this skip and out of the methods this one is the most consistent for me, maybe it helps someone else too. But i just use the ledge grab setup and buffer jump, cloak past the chains, dash when you clear the cage and be ready to walljump as soon as you touch the wall, right is held all the time
Pressing dash twice only after heal (has been pretty consistent for me) instead of spamming it makes you less likely to dash up the wall and bonk your head
The soul collection for it in the video only lost 4s, it will be a bit more on average however, because the Judge is pretty rng and getting the 2 enemies bunched up saves time. It might be possible to optimize more though, given that you can basically facetank here as you get another heal after.
Make sure to trigger the Pilgrim spawn on the ground or they might not spawn. The conchfly pogo in the next room is optimal, so 8 Silk is enough out of the room
Just wait for the conchfly to start aiming to the left and then go for it, if you heal early into the dash its basically guaranteed that youll get hit and sent to the ledge, so you dont need the second dash
This is a really easy way to get the wall jump on this room every single time, it loses a few seconds but it should be free if youre struggling to do it the other way. It makes sure the conchfly doesnt have enough time to wander around. You just need to wait a little bit on the edge, then jump cloak and do the pogo
steps probably overkill but i was really struggling with this jump so hopefully this explanation can help someone else too :] first clip explanation, second clip full speed of the skip
The most consistent way ive found of doing this skip is waiting for the other enemy on the wall to go down, then you lure the conchfly, use the cloak until you reach the lower platform then immediately jump and do the pogo
Absolute banger of a room, this skip saves like 12-13 seconds over going to the right side. You can use an enemy to pogo but this is much faster and less rng, but very difficult
 7
 7


 5