Category Do It Now Go #This Is Known But Nobody Does It So Reposting #I Beg Everyone To Do This Please
 19
- 🔥9
Category Do It Now Go #This Is Known But Nobody Does It So Reposting #I Beg Everyone To Do This Please
19LP epogo post number 67676767 but maybe it can be useful to someone, i didn't really like any of the other setups much so i labbed this one
this has the common start with dashing towards the sporg at the start and upslashing it, then i buffer another dash off the platform when i land there. I then land on the left mushroom in the background, do one minihop and then jump towards the pogoable mushroom and pogo on the left side of it. If you pogo too high/too far right, you will get launched into the sporg, you can react to being high by holding left more, so that you end up to the left of the sporg, which is usually savable.
be ready to tank the explosion if you think you will not make it up otherwise, quite often you can save attempts that would otherwise fail by tanking the explosion
13Update to this, idea from Javier. You can always nail off the left wall to fix your subpixels for a faster retry, if you hit it then it doesn't matter.
2I couldnt find any tutorials for left side rafters so I thought I'd make one.
The skip is really lenient so you can experiment with a combination of 1 or 2 fireballs, as well as 1 or 2 damage tanks. The lower the fireballs and damage tanks, the harder the skip (not really, i find 1 damage tank to be easier than 2). This flexibility makes up for vengefly spawn, behavior, and knockback rng.
When you reach the platform in the screenshot, you want to do 2 full jumps. With the second full jump you'll move left midair and damage tank the vengefly and get knocked back right. Then pogo, fireball to stall, pogo again and dash into the platform as shown in the first video. In the second video I got really unlucky with the vengefly but I was still able to get the skip (i slipped off but thats beside the point)
Edit: Sometimes the vengefly spawns too far left. In that case, you'll move slightly left with your first full jump to grab its attention, then while still in the air, move back right, do your second full jump, and do the rest of the skip as normal)

 1
At long last, we have a solution to safely fireball LP THK's triple slash attack. This punish can avoid the extremely obnoxious frametraps he had in a bunch of scenarios. Recommend using hitboxes to get a feel for the backswing of the 2nd hit, you need to fulljump to not get hit by it
Due to his notoriously short idle timer on LP, pogoing triple slash meant that you could not safely fireball him or you risk being hit - which led to situations like multiple triple slashes being a damage tank or safely nailing him while on full soul. With this new tech, that is no longer the case. Thanks cerp for the suggestion, this is huge
27Pretty sure this kill is faster and more versatile than the other kills that've been posted in the past. 2nd clip is what you're aiming for, but there's plenty of ways to handle it if you don't get all the nails. My best with this is about .4 faster than what I got doing other strats. The damage rotation is by @鴨子哥🦆 , or at least that's who I saw do it
Another improvement for small jumpback rng, if you're fast you can just do it damageless, saves a clean 0.3 in no freezeframes.
2nd vid is showing off a bit of tech that helped me get extremely consistent at the correct knockback direction: If you're holding up while damage tanking, you can buffer the upslash out of the damage tank. I pretty much am never too slow anymore (1st clip is old lmao) so I never have to do the crazy pogos and ntas and just get to save a full second on small jumpback rng for relatively easy execution
Improvement to the New Optimal False Knight Strats for LP
Update to the new LP False Knight strats, this is a consistent way to stagger skip FK when their head is turned the wrong way. Walk into FK for the damage tank, do not inv knockback cancel, walking into them is more consistent for this in my experience. It is the same speed as when the head is turned the right way, which means you should never delay FK slashes now. The only situation where you should stagger FK to the right in the whole fight is when they do the big back jump at the start and then jump back again.
This significantly increases the timesave for this strat, the new numbers are:
0.5s saved on the jump up RNG
0.7s saved on the small jump back RNG
0.5s saved on the big jump back RNG
6Alternate strat for the final skip to the grub in Who%, it seems slightly easier since the jump for the other strat can be kind of tricky, but it's most likely up to preference. Managed to make it with a fireball going the wrong way lol
16New Optimal False Knight Strats for LP
On LP, False Knight will do a rollback after being staggered, unless they both get staggered to the left and are on or close to the ground. This rollback loses 0.5s. A damage tank loses 0.3 in freeze frames. This means the following for cats where you full kill FK (if you do not full kill FK, the only change is that you do the damage tank and left stagger Phase 1 on small jump back):
On the pattern where FK jumps up at the start, you do phase 1 as normal. You can then stagger them to the left in phase 2 by walking through them, as shown in the video. You must delay the last nail here until FK turns back around, or else they will stagger with the head turned the wrong way, which is timeloss for next phase. Then you do the same thing in phase 3, except don't delay the last nail as for last phase it does not matter where the head is turned. This saves about 0.1 to normal strats, AND is less punishing if you miss a nail in Phase 2 and 3 as you don't get hit a second time if you miss a nail.
When FK does a small jump back, you do the damage tank as in the video and walk through them. This cancels FKs jump, making this Phase 1 very easy and consistent. You then do Phase 2 and Phase 3 the same as on the first pattern I mentioned (so do the walk through thing). This saves at least 0.3 to current strats, but realistically more than that as any frame FK jumps up on the second jump is lost twice, as they also have to come back down from it to start the head popout-animation
For the big jump back, and then another jump back you do the fight as normal except Phase 3, where you do the walk through thing with no delay on last nail and save 0.5. This is also in one of the clips.
For big jump back and then a jump up, you stagger to the left in Phase 1, then do the same that the first two patterns I mentioned do, saving 0.1
19 3
 2
 2
every non ibaldur category
If you miss a fireball skip, your subpixels get significantly worse for potential coyote frames on your next jumps. Nailing the wall (mostly) fixes this and lets you get much better chances of hitting it 2nd try. As far as I can tell, nothing is as good as the subpixels you enter the room with, but it does definitely help
easy and very consistent way of doing soul catcher early control. Basically if you jump after slashing the baldur onto the planks (you need to delay this jump slightly after the slash), the baldur will queue up a roll and roll at a consistent timing when you get close to the ground and enter the roll rectangle hitbox. You want to stand as close to the planks as possible and buffer the jump onto the baldur.
Picking up catcher can still be tight with this but should generally work as long as your timing for the pickup is good. Also the baldur nail strat is not required for this of course, just swag (but it's very lenient)

Easier and consistent way of getting through the baldur without spit rng. Optimally loses about 0.5 to a first spit but saves 0.8 to a second spit, but the slower/easier method breaks even with a second spit (losing 1.3 to a first spit)
Do 2 fireballs and nail the mini baldur once, then line up on the left side of the planks and fireball right before the mini baldur hits you. Make sure your nail hits the mini baldur and big baldur so you have enough soul for the last fireball. Nail cancelling it immediately like in the first clip is pretty tight, but if you can do it consistently then it is 100% worth to do this.
Keep in mind that you can't consistently do soul catcher early control with this strat, which means unless you do the fast version, it is most likely not worth it (assuming you go for the early control every time)
List of 0fb setups. It's a bit sketchy because 0fb are still being labbed at the time of writing.
Pantapogo https://www.youtube.com/watch?v=4wdfFMLblz4 , darknight https://www.bilibili.com/video/BV1fDQSYkEXo , cronster https://discord.com/channels/772964112908156938/822611717560467467/1353770108455096445 , mindful https://discord.com/channels/772964112908156938/836364889604751450/1356278274476736695 , vsync/low fps epogo https://www.youtube.com/watch?v=Lu067--PBtg
15This is a list of epogo setups for latest patch. This is not meant to be comprehensive, but rather to include the most common setups used by many people and/or good starting points.
I didn't include any 3fb setups because they are slower in soul collection and not easier than 2fb ones
These are beginner friendly setups. Lots of people had success with cooperrekcahpogo https://discord.com/channels/772964112908156938/822611544231772170/1103569291732856862 or meemeepogo https://discord.com/channels/772964112908156938/822611544231772170/1158701783611359232 . Both are basically different ways to get the timing for when to pogo the bouncy mushroom and are pretty lenient. Cooperrekcahpogo is a 2fb variant of cooperpogo 1fb setup (see below), so it makes a bit easier to switch later on.
For people who have experience with 1221 firepogo, https://discord.com/channels/772964112908156938/836364889604751450/1356194229545861201 is a 2fb setup that mimics firepogo movement. This setup is not recommended for people who are learning epogo from scratch, only for people who already know firepogo.
There are lots of different setups, the idea is the same as 2fb but timing is tighter. Lots of top runners use Callipogo https://discord.com/channels/772964112908156938/822611544231772170/896298303589855242 or CCpogo https://discord.com/channels/772964112908156938/822611544231772170/916160933485768764 .
Cooperpogo https://discord.com/channels/772964112908156938/822611544231772170/935163254798417990 is a tighter version of cooperrekcahpogo so it's easier to pick up coming from it. Many other 1fb setups can be found here: https://discord.com/channels/772964112908156938/822611690871980092/1228407371387113634
These setups are generally harder than 1fb but not faster. Mainly used in ibaldur routes. At the time of writing, 0fb are still being labbed, so I'll provide a tentative list below that will probably become outdated soon.
10Good replacement for the cue on when to jump for pacifist pogo on lp since the background objects are different than 1221
 4
Getting leftright at the top like this saves .1 maybe a little more optimally if you dont have cyclone for the room outside of king's station heading into edge (photoshop room). idk what categories use this but theres definitely something that does lol. LPTE maybe?
4fast backup for if shit goes wrong with the new aspid pogo strat. super useful and barely loses anything (if at all?). has potential
10Dunno if known but this is like by far the fastest thing here, seems to save .25ish, maybe slightly less. Dont do this on 1hp, it loses .4 to get hit left by the hatcher but that's still worth it. It's kind of precise for what it is (which is why the jump is required before the pogo) but 100% worth going for
4slightly faster variation of the kill above and some backups if you dont get the last nail hit of the first cycle. also just good examples of how you can wait out his shield instead of hitting it
3Fast way to kill GHS, need at least 7 soul entering the room, if the rava on the middle row dies to fireball do 3 dashes instead of 2
8Double heal LP Uumuu setup when entering with full soul
5I really didnt find the existing set up for the slopeball easy at all, and from my understanding, neither do many ppl, esp for shamans. Thats the reason why i've been looking for a more consistent (and hopefully faster) way of setting it up.
To begin with, you are going to line yourself up with the edge of the platform (or run up to it), then you are going to dash making sure you still have your aerial dash, then you dash again once you reach that line (1st image). Afterwards, you need to pogo as high as possible (you can use the horizontal line (2nd picture) as a reference, but you have 4f to pogo). To finish it up, you need to dash as high as you can (this roughly lines up with the beginning of the root, but i found it more comfortable to just dash at the peak of the pogo) and then shortly after the dash ends you need to fb.
The most common mistakes i've found are not dashing close enough to the edge of the platform, pogoing too late / too early, delaying too much the dash (its not super precise, but it can happen), fbing too late (this also isnt too precise) and doing the final dash up to the platform too low (the wiggle room for this will obs depend on how well you did the rest). Most of this will either cause you to not reach the platform or to simply not get the slopeball, depending on how well you perform the rest.
Its also worth mentioning that you can try to back it up by replicating the skip starting from the pogo.

 3
any wings category lol
this slope boost saves .15, pretty tight since you need to dash from the transition. you can actually dash too early though and land on the ground, but much more frequently you just miss the slope and lose nothing or hit it and save time
shoutouts to @JKmaginary for strat idea
this aspid skip is usually damageless, saves about 2s to the damage tank strat, and gives a lot more soul, however its much more fickle
its really important to delay the dash that aggros the aspid or it'll fly up too high, if the aspid isn't clearing the ledge at the end you probably delayed too much. However the aspid being too low is much easier to backup.
The spit dodges are a bit tricky at first but pretty consistent. You might need to delay your slashes and dashes more based on the aspids positioning to avoid falling in the spikes.
The ending is the most difficult part. The aspid can only take 7 hits so you need to be careful not to kill it if you mess up. The strat normally gets 6.
Ive gotten hit sometimes at the ending and still made it, I think you can get this damageless but I dont think you should do this strat if you're afraid of getting hit
Definitely just play around with it, its very feel based but its consistent once you understand it for the most part, you do have to back it up a lot. However backing it up by being one spit later makes it go even with the old strat, and getting it two spits later is only 1.5s.
8(mainly directed towards aslp but applies to 1xx lp as well)
Broken Vessel has 525hp; stagger values are 9 hits for combo (<1s/hit) and 13 otherwise; headbanging phase starts for the first time once you deal 155 damage, so 4 shade soul hits is always enough to trigger it.
You want to always start the fight by firing 2 shade souls (where you do a small jump between the first fb and the second one), which has a few different outcomes:
-both shade souls double or one triples and the other singles (e.g. whilst bv is on the ground or dashing towards you):
For this case get 4 nail hits before the headbanging phase starts*, and then you want to get 1 nail, 1 pogo and a ddark, followed by 1 upslash, one pogo and another ddark, followed by a pogo and a ddark, finally ending with a ddark.
-only one shade soul doubles and two single hit:
For this case there's pretty much no risk of staggering before the headbanging phase starts, so try to get 7/8 nail hits in and then do your first ddark. After that you want to do a sequence of 1 upslash, 1 pogo and a ddark (all) twice, which will send the boss into a staggered state. Depending on wether you got 7 or 8 nail hits at the beginning you can either directly ddark the boss (or shade soul double if you're feeling spicy) or you'll have to do a pogo into the ddark.
The two most common cases are the ones described above, but there are some other misc starts to the fight, for example, where you get "bad rng" but the 3rd shade soul doubles (or even triples in some cases) or you try to go for three doubles. Essentially, if you get 5 shade soul hits at the start of the fight you want to follow the 1double2singles case (soul gathering a little less strict), but instead of finishing with a ddark you can get enough soul for a last shade soul.
*try not going for more than 4 because stagger is at 9 combo hits (or 3 hits if you start with 5 shade soul hits)
alternative left climb to the double pogo strat, it's pretty much same speed (although my fastest was like a frame faster with this). easier to get a fast time with imo
3setup for this inventory drop, saves 1.7s over no inventory drop, setup works for both 1st/2nd try inventory drop
basically you want to close inventory a little bit after the screen goes dark, or right as it happens if its 2nd try inventory, hold left as its closing and start slashing, after the 2nd slash let go of left to not cling the wall, then right before ur 4th slash hold right, let go after ur 6th if ur trying to greed no cling, or you can also left/right from this cling, or just slide down slowly
unlike 1221 where theres actual directional cycles, for LP theres just idle times, so you just need to react to positions
as a general rule, if the first husk walks decently far, inventory cancel the 2nd dash so you can fit in 2 dashes more consistently
if the 2nd husk is close to you, nail slash them before the 2nd dash, if they're really close inv cancel the 2nd damage on the 1st EVEN if they're pretty far right
for the damage on the 2nd husk, you can inv cancel it if ur close to the door or a dash will get you there, theres some patterns where you'll want to take the knockback since its double walking speed but often the heights just really bad
Lastly, if the 1st husk starts walking right, just take 2 damage and make it up after sly, you can use a nail to prevent the husk from walking too far for the shade spawn on your last damage
7free hit of soul before claw, works even if they dont attack
i think this is an example of a perfect or close to room, the main things to note are:
1)at 13s in livesplit you want to stall a bit to bait the crystal hunter into shooting;
2)at 15s in livesplit you want to react to if they're shooting or not, and if they are i think you want to walljump and then dash into the above platform, i did a normal jump bc i kind of improvised, but i think its too hard to do consistently in runs;
3)at 17s in livesplit its better to do wj just simply to avoid landnt;
4)the ending strat for the early control, it requires an overbind bind to right stick down, slash as soon as you see the crystal hunter enter the screen and make sure your first pogo hits the ddark crystal, then copy what i did;
here i got extremely good rng which is why the room is so fast but i could consistently get a 32 room if the crystal hunter gave good rng and mid 33 if the they gave bad rng, for reference current comsob i think has a 33.98 the only problem for this strat is that the crystal hunter climb is extremely hard to not get hit on so its very risky
2 extra things to add that i didnt do in the video but i found out later on are better:
1)at 16s in livesplit you can do snake wjs to avoid both landnt, i think its harder but worth cause if you get landnt youre fucked pretty much;
2)at 11s in livesplit you can snake wj on the platform, its hard and needs to be done at the top of the platform, but it makes the hunter climb a easier and more consistent;
2Killing the devout with wraiths + shadesoul saves 0.3 over ddark + shadesoul.
Does have a bit more risk if the devout backs up, if it backs up after 2 hits you can recover with another wraiths or ddark, but if it backs up after just 1 hit you kind of just cry. I was only getting the backup about 10% of the time though, so probably still worth.
Highly recommend vsync for this, with in game cap of 150 I was getting 2 hit wraiths (without devout backing up) 20-30% of the time, but switching to vsync I got no rng missed hits.
2Doing a cyclone on right drop then dashing to the middle allows you to do the first cyclone sooner and charge the second cyclone while you're dashing to middle drop.
Saves about 0.3 over cycloning twice in mid drop.
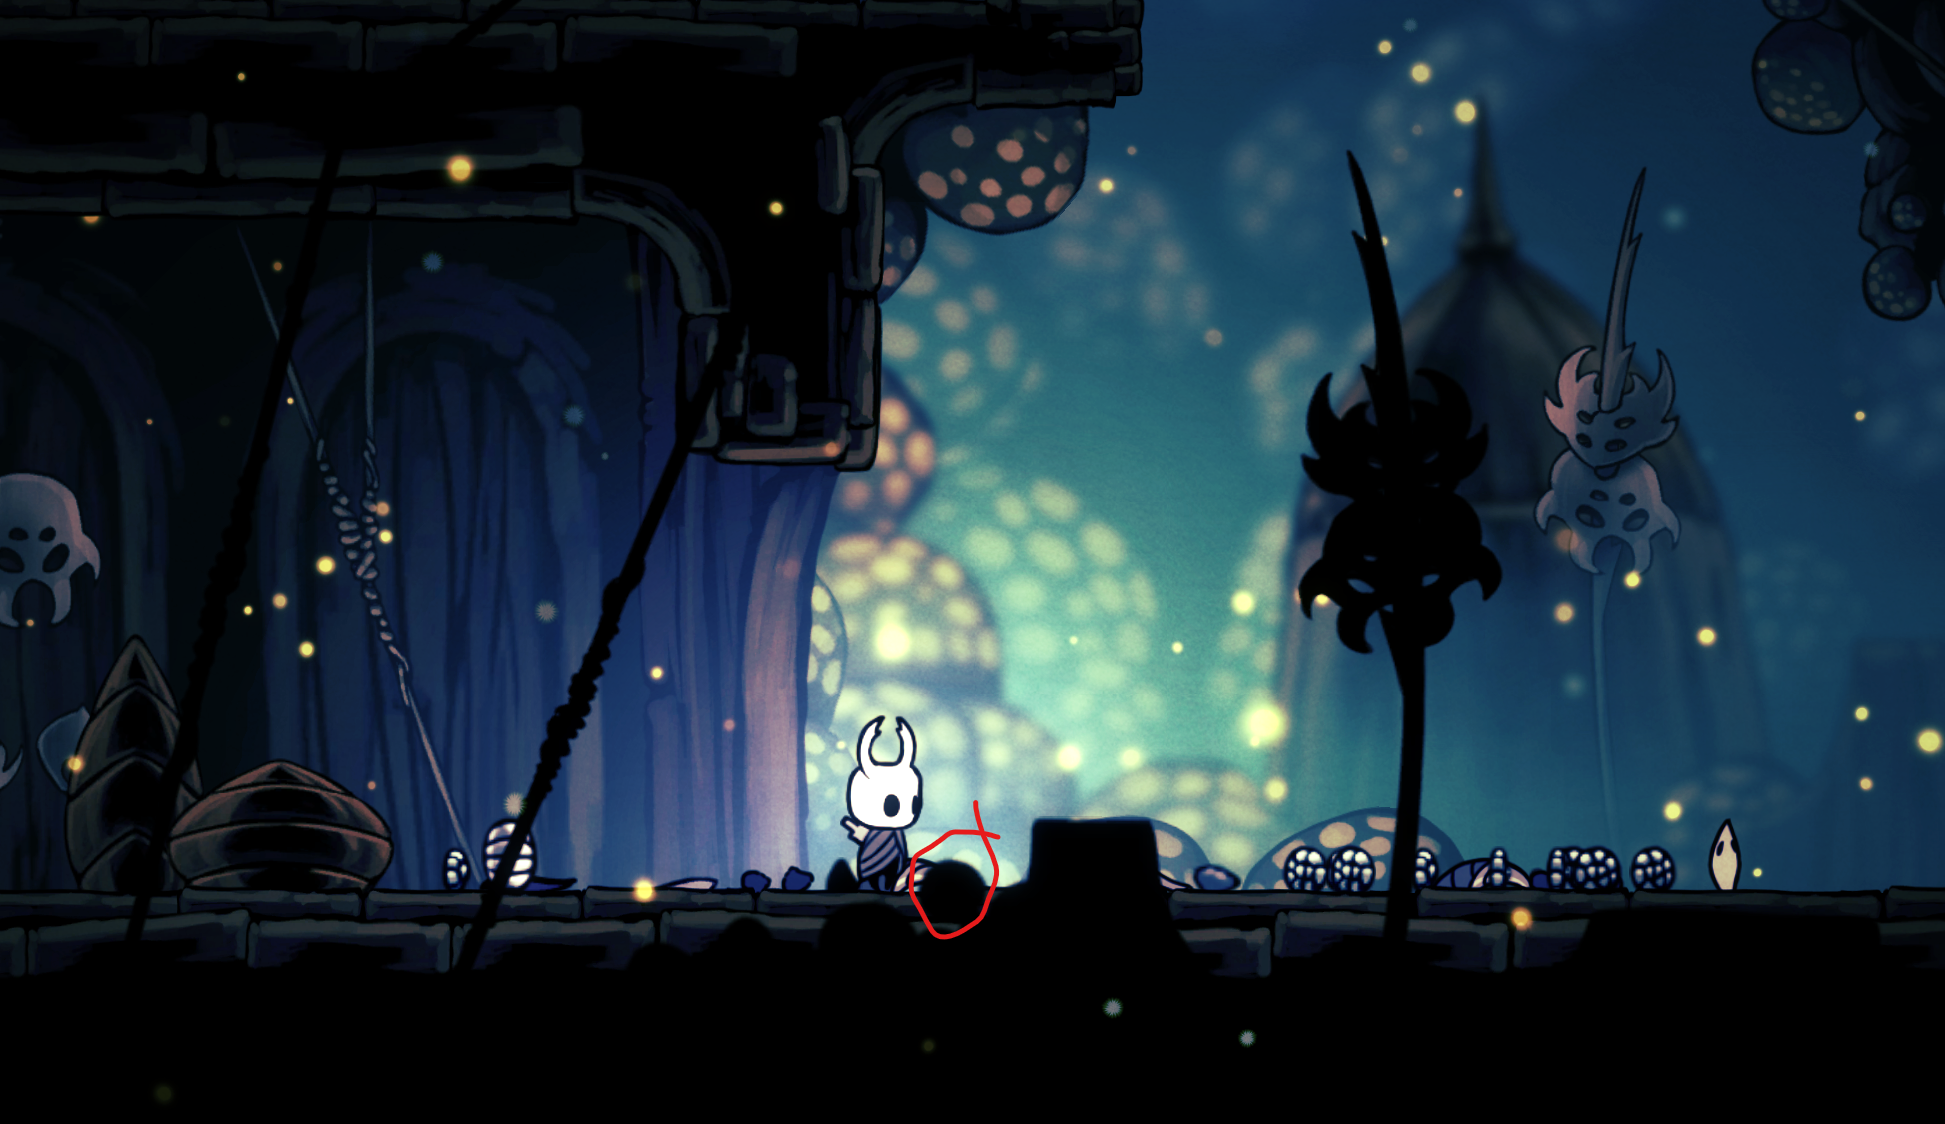
9Very simple and easy setup for lp epogo. Full jump slightly to the left as soon as you touch the platform, then fall right to the mushroom. Use mushroom pogo to move to the middle of the platform and wall (make sure not to go too far left or the spore will bounce). The dash after is super lenient, you can go pretty low and it will still work. The trick has been very consistent for me in practice and the timings are all lenient.
The setup is dependent on sporg being asleep so if you miss but still have soul you need to do a backup (such as 2nd video) to get the setup again.
13If when the knight hits the floor you press down and then strat mashing up while holding down (only if you have socd cleaner, if not, just mash up or down or both), you can quitout as soon as you sit for the second time on the bench (second save icon, also has a pretty clear sound cue) and still get saved on mound bench with vs. Saves 2 seconds, not entirely sure what im doing to save that time (edit: i think in the original you didnt mash up after sitting for the first time for some reason), but there's no need to wait longer.
Apparently i didnt post this in strats when I found it a while back but this one (which i call cooperrekcahpogo because it's based on a combination of my old setup and cooper's setup) is imo the easiest LP epogo setup by far. Anyone who's still doing my old setup should switch to this one. Start the dashes when you hear the sporg spawn, there's no need for visual cues or anything, and like with my old setup the timing for the dash is really easy because the bonk on the platform slows your vertical momentum.
5idk who needs this, here are fireball ranges in the wk arena, for when you need to be sure you're hitting the offscreen guy, use the central background pillar to orient yourself and stick close to it
Consistent set up for wings grub that requires a hazard dmg tank. It is really consistent and easy, you have to jump and slash without touching the slope, jump again and fb at the peak of your jump (later than you think)(3rd clip [full movement to the grub]).
If you touch the slope on the way up the first time, you will be more to the right and the fb will slope but you wont have time to pogo it (1st clip). If you fb to early (or too late technically, but thats more rare) after the second jump, the fb wont slope (2nd clip). If you mess up one of the object pogos you can back them up (4th clip). If you miss the skip, you have to dmg tank again. (Be careful with not falling too much or your hazard respawn position will change and you will need to climb back up, which is quite tricky and slow)(You can use the crawler to the left to get some soul if you miss a few times).
This is optimal regardless of if you get wings afterwards or if you do wingless route.
You can use 2 flying enemies at the end to make it easier or if you dont have an extra cast/ health.
Final clip is how is looks without hitboxes.
So gruzers always spawn in the pattern in the picture regardless of when/where gruz mom dies and where her corpse is facing. To try to maximize dmg at the beginning, where the positions are consistent, you can stand close to the end of the tail (doesnt matter where the corpse is facing, but it works better if the tail is looking right bc of the gruzzer thats the highest), do two full jump once you see her last shake (3rd) and slash on the second one on the way down. If you stand closer to gruz mom you are risking more getting hit but you have a higher chance of hitting the 5th and 6th gruzzer and the one on top, if you stand further you will get hit less but hiting more gruzzers is more difficult, find the balance you prefer. You should priotirize hiting the 4 on top. Best approach i found is to do these jumps, hit the 4 on top and the 2 next ones if you are lucky/precise with your slash, kill the gruzers that inmediatly go towards you (especially the ones you havent damaged) and then try to finish out the rest, by this point basically every gruzzer should be damaged so you can kill them in one blow. You can also try to slash earlier after the 2 jumps if you are having trouble hiting the one on top right away or with gruzzers on the ceiling having 8 health or to slash a bit later to try to hit 5th and 6th gruzzers more often, again, your preference.
Make sure to react to the third screenshake insteadd of predicting bc you will be too fast if you predict.
Also, keep in mind its still rng and can go very wrong, I got pretty lucky in the video.
 20
reposting here, doing a fast nail cancel allows you to chain shrieks with no overlap, nail is iframed, id use an upslash to avoid recoil though
https://cdn.discordapp.com/attachments/822611746086715423/1076882128622600313/2023-02-19_08-02-48_-_Trim.mp4
8This is the 2fb version of the other post, check it for more details, you need to turn around later so you are far enough
Faster strat for setting up the shade insteadd of inv droping into the spikes, saves like 1-1.3 seconds depending on how much you greed the inv drop strat.
Way easier than the inv drop into spikes, you dont need the inv knockback cancels except for the last one and first one maybe and you can also skip the nail hit to the husk which barely loses any time (.1 or so) if you dont want to do them.
5 3
here you have another spicy stallball, basically the wj is almost frame perfect (or maybe it is, prob depends on set up) and you need the 3fbs to be quite precise as well (yeah, im pretty sure you need all 3, maybe its possible with 2, but i couldn't get it).
EDIT: it is possible with 2fbs:
https://discord.com/channels/772964112908156938/822611544231772170/1070092286140092466
If 1037 was actually optimal for this category this probably gives the edge to lp.
It saves 20 seconds in lp compared to doing the shade skip if done perfectly.
 75
 7
~0.1 slower than the damage tank inv drop but easier, 0.8 faster than no inv drop. nail slash is to give correct alignment for the inv drop so that you don't get a slope drop from one of the ledges below
72ye uh so apparently you can cdash high enough on the pair to get over that ledge which saves 0.3 to dashing
Different strat for the moss knights. Wiggle in and out of the mk aggro range instead of forcing a jump at the start. Do 6 swings total, walk a bit back to get the geo, walk forward and shoot vs. Have to delay the vs to hit the second mk due to lp range (walking forward before using vs also helps with the timing of the nail swings to not parry). If you don't walk back you will lose a lot of geo. Saves about 1~1.3 seconds on the old "force the backjump strat"
Biggest timeloss is delaying the backjump after the 6th swing. Stop the nail swings if the mk stops attacking, else you will hit its shield.
Second variant shows a way to break geo rocks and immediately go for the nail cancels on the rock/mk. The issue with this for scsbcpte is that you will most likely lose about 20 geo (I go for 160 almost every run, this one gives about 140) so it can be done if you need less geo at this point. This saves about .3.6 on the other wiggle strat.
9An update to this post.
It turns out that you can make the set up easier if you stand still against the wall, nail slash twice without holding any direction, press and hold left and, one frame after the left input, press and hold jump. The rest is the same as before.
To do this consistantly you just have to press the left key and the jump key one after the other as fast as possible (if you go for this keep in mind that this feels almost the same as pressing them at the same time, but if both inputs are on the same frame, the trick wont work) and check for the weird landing sound before commiting to the fb. Here is an example of a successful and a non successful attempt, the trick with hitboxes for better understanding of it and a slow motion segment of the set up change.
9So this is a set up for the low% stallball that has been used for a while, but I dont think anyone has published it yet on strats.
With this set up you have 2 frames to shoot the fb at the end instead of just 1, which helps a lot.
In terms of the set up itself, you have to stand (dont hold any directions) against the wall, hold left and jump once you reach the highlighted part of the grass (see image), if you hear some kind of landing sound, continue with the trick and fb around there (see image), if you dont hear anything strange, turn right, stand still against the wall and repeat the set up.
This works on both 1.5 and 1.4, the window when you can jump is pretty tight (1 frame), but it makes the trick easier overall.

 10
For the first mawlurk the key is putting yourself against the wall and dashing, then just go as fast as possible and make sure to jump over the mawlurk, one of the infection projectiles might go towards you, after passing it, you can tank the dmg and continue or you can delay the dash or stop entirely until youre safe, its good to mention as well that a lot of the times it lands right next to you and doesnt actually hit you, the projectile hitting doesnt happen too often.
On the way down you can do a little ceiling boost, but make sure to not land on the most right zone.
For the second mawlurk i recommend jumping where the shell next to the wall ends and dash slightly above the groung to avoid corner correction. From there, keep dashing and pray to not get hit.
As for the 3rd mawlurk, you should dash just as you pass the little mark on the ground next to the grass, and you can stop holding left for a moment if you want to be safe, again, there is a chance that a prejectile hits you after clearing the zone where the mawlurk shoots, but its very difficult to rect to and its rare enough.
For th 4th one I try to dash as i land on the slightly below level, but I havent found a good enough set up, the most important thing is to not fall into the spikes.
After clearing it, you are going to want to stand to the right of the hole, dash left, jump, land on the higher ledge, dash pogo and dash quickly, and either wj and wj 3 more times on the left wall or land, jump and wj 3 times, hold right after that last wj for a bit and pogo the enemy thats directly above you.
Continue to the last mawlurk, dash on the middle of the high part, dash again as soon as possible, jump, dash again as soon as possible, as you land jump, stop holding any directions, pogo and dash over it.
new strategy for petra arena using left side. I do not believe that this is the fastest strategy but I do believe that it is a step in the right direction for LP. we have to start ignoring what is considered fast on 1221. Left side petra arena seems logical if you need to kill a stray petra.
Dash onto the left trap platform as soon as possible to activate it extremely early. Jump off of it as late as possible and fire two fireballs to the right. Ideally you get 3 hits on the first petra and 2 on the second petra. Alternatively, you might get only 2 hits on the first petra. If you activated the platform early and jumped late you will be just in time to catch the platform.
Saves almost a second with really good execution and rng
13I've been messing with double dash 1 fb epogo and Ive found it way easier to do 2 fbs instead of just 1.
The inputs arent super presice and there is a lot of wiggle room.
If you are taking dmg as you are pogoing the spore you can try to dash closer to the ceiling and/or moving forward after pogoing to get further. If you detonate the spore after bouncing in the mushroom try delaying the second nail slash in the set up a bit less or try pogoing the bouncy mushroom a little later.
The height of the last dash can also be slightly modified as well as adjusting/removing the small delay inbetween the nail slashes in the setup if your having problems with it in general.
Also, I recommend putting yourself against the wall of the block at the beginning and letting go of any directional input until after the 3rd dash and letting go of them again after the 1st fb unless you are missing the sporg of getting hit by the explosion as mentiones earlier.
7Saves some time over just dunking in the acid, (dont try this at home), it's safer to go up until reaching the warp zone and then trying to get the stallball, just in case you fail. You'd need to take more soul or just go into the hornet 2 fight with less soul if youu go for it. Its also another way of going into the fight with full health if you get it. Still, prob more viable for a comsob or something.
1510saves some time bc you dont have to go to the right and can directly go up. Pretty easy and consistant, if you are too far right you'll probably still get the stallball but wont reach the fb when pogoing and if you are too far left your vs will get eaten by the wall.
Not sure how much it saves, but its probably worth going for (2 seconds or more, maybe?)
 31
fast lp epogo (you're not pogoing the explosion but sure) with dash and vs, this was done at 50 fps, if higher is possible it's pretty tricky, the pogo off the bouncy mushroom is fairly precise because you have to be very low and left
16first post by frying whales, this is the most consistent setup I've found for the uumuu extra on the first cycle.
When you notice the extra jump to the wall and wait till uumuu stops moving, then go over uumuus head to avoid the attack, the dashes afterwards are done when uumuu start moving again.
9Latest patch has the ability to get inventory storage with just quick map, using this and the fact that benches warp you, we can skip the tutorial, wake-up animation, and the need for delayed interaction storage for mound skip. This will save 5s over the DIS mound skip, and is much easier, but will instantly kill your run if you mess it up. We also have to bench again because mound hardsave will override the bench we use to cancel the warp since the bench comes first, and you need to quit out to have access to quick map storage again.
Steps:
13 1
cdash early control from shade cloak on 1.4+. Need to tap up+dnail as soon as the scene name changes to Menu_Title (-33.0, -2000.0) (idk cue for when you don't have mods on, just need to learn timing) then hold cdash. first found by yihou i think
6Better drop for latest patch all skills. saves .8s on previous single dive strat. Not too tight of a timing, savable if you miss the small platform by winging.
13saved 0.04s over decent cdash strat, but dash buffers mean they are way more consistent than timing the cdash strat well so on avg i saved about 0.1-0.2s
edit: clip by AlejsXY, saves another ~0.1s when performed well
https://media.discordapp.net/attachments/836364889604751450/957446099847741450/fungus3_05.mp4
Forgot to post this when i found it a while back. Easiest epogo i've come found by far; dash into the wall when the sporg goes over the circled mushroom in the background, fall right and pogo off the bouncy mushroom so that you bonk into the platform, then dash 2fb pogo
 15
tldr: on 1.4 leave middle elevator up at the top when going through DLC rooms and use the elevator shaft to drop down. on 1.5 leave elevator at the bottom and do 1.5 elevator squeezes, check here for rough timings: https://discord.com/channels/772964112908156938/836364889604751450/937662345151414272
2Consistent soul collection for the baldur before greenpath on current patch. Enter the room to the left instead of the right and pogo the first tik tik (don't sideslash into a pogo or you bonk), kill the remaining tik tiks on your way up to the entrance, and hit the tik tik above the entrance once. If any gruzzers actively get in your way, you only need to hit one of them once. Loses a tiny bit of time to the normal strat, but this strat is resistant to gruzzer rng.
 98